Sunday, 9 November 2014

Foundation 101: Choosing the right shade...

When choosing a foundation a lot of people will simply go into a shop and try a colour on the back of their hand, etc to see if it's a good match and then buy it. Sometimes this can work but more often than not when you try the foundation on you will find that it isn't quite right. 

If you take the time to study the tones and colouring of your skin there is a very simple and effective technique that can help save you money and look amazing and I am going to share it with you...

Spend the time getting to know your own skin's undertones. The skins undertone is the natural tone of your skin that will never change, your skin can appear lighter or darker over the years due to environmental factors but your undertone will remain the same.


Those with a cool undertone will have a pink or rosy tint and lighter skin tends to burn easily when exposed to sun. Foundation shades such as natural, beige or cocoa would be recommended.


Those with a warm undertone will have a golden or olive tint and tends to tan easily when exposed to sun. Foundation shades such as golden, tawny, honey or chestnut would be recommended.


If you are unsure what your skin undertone is please check out my guide here.

So now you have a rough idea of what shades you should be looking at to match your undertone you can have a little fun testing different shades using samples. 

Pick out a colour that you think will work best for you and then pick out the shade directly to the left and right (one shade lighter and darker), once you have these three shades go to a mirror and swipe a strip of each along your jawline (by testing on your jawline you will ensure that you are buying a shade which will match your neck and decolatage). 

The shade that disappears first is the front runner but you will need to go outside into natural light and have a look in a compact mirror before being absolutely sure – if the foundation is still gone it's the perfect colour for you. Remember, shops are lit to encourage you to buy products, so it is important to check the foundation in natural light as that is the everyday light that you spend your time in.

And there you have it... if you follow these steps you should have no problems finding the perfect foundation colour for you.

If you have already found the perfect foundation colour for you but are unsure about the formulation and want to change the brand, there is a funky little website that may help – With Findation you simply enter the brand, name and shade that you normally wear (it is recommended that you input 2 for more accurate results) and it will give you recommendation based on the colour match.


If you want to know more on finding the perfect foundation formulation for your skin type please check out my next instalment by subscribing, you'll then receive a notification when it is posted.


1. Photo credit: Jeff Howard / Foter / CC BY-NC-SA
2. Photo credit: Horustr4n / Foter / CC BY
3. Photo credit: zanaceabuna75 / Foter / CC BY
4. Photo credit: birdfarm / Foter / CC BY-NC

Friday, 24 October 2014

How not to upset your potential makeup artist/hairstylist...

It usually takes an awful lot to upset or anger an experienced wedding makeup artist or hairstylist to the point they are happy not to receive your business. To ensure that this does not happen to you please check out my top tips.


Understand what your budget can afford by doing some research

There are hundreds of extremely talented makeup artists out there and thanks to the internet they are only a click away. Use search engines, speak to friends and check out wedding blogs and forums for peoples recommendations to find out who is in your area, once you have found a couple that you like it is important to take the time to look at their websites. Before you make initial contact by asking for a detailed quote it is important that you understand what services and value they offer so you can narrow down your search based on what your budget can afford and the value they offer. If you still cannot decide once you have a few quotes ask any questions that you feel you still need answering, this will hopefully give you an idea of who you are most drawn to.

DON'T ask them why they are more expensive than the makeup artist on facebook who is constantly posting selfies and doesn't have any pictures to show her work. If you have done your research you shouls already know the answer to this question so it is likely that this will be seen as highly offensive and asking questions that are not very well thought out will not end well.


If you don't get the discount you asked for, don't take it personally

Some makeup artists will offer discounts but don't expect everyone to do the same. Generally, the more popular the makeup artist is the less likely you are to get a discount as they know that if you don't book with them they will have no trouble filling the booking with someone else. That said, there is absolutely no harm in asking - just don't be offended if they say no. You are the one that decides whether to book with them or not so if your budget will not stretch that far, either figure out a way to make it work or book with someone else who will give you the best that you can afford.

Let's face it, you don't get angry at the expensive car dealership down the road because you can't afford that Bentley when other people are driving around in them and it is a similar situation with wedding vendors. You may not be able to afford the most expensive makeup artist but you shouldn't settle for anything less than the best that you can afford.


Whatever you do, please don't threaten us

Unfortunately it happens a lot more often than you would think. You open your emails to be greeted with "Well, the woman up the road said she can do me and my mum for £50 including a trial. I'd really like you to do it but I don't understand why you are so much more expensive, can you do it for the same price? I've already spent loads on everything else so I'd really appreciate it" or "If you give me a 20% discount I will tell all my friends about you so they will hire you for their weddings too, if not I'll go with someone else and you won't get as much work."

I can't speak for everyone else but personally the only thing these emails achieve is winding me up. It's fairly simple, if you want to recommend me for doing a great job to anyone you know that is getting married, you will. If you want to go somewhere else because they are cheaper then you should. If you have gone over your initial budget and now can't afford everything you want it is not our fault, you just need to reassess what is more important to you and re-budget. Please remember that we are running a business and not a charity.


Friday, 17 October 2014

Do you wear glasses? Well here's some make-up tips for you...

Wearing glasses should not limit you from looking gorgeously stylish so if you're a little self conscious about your specs or just wondering about how to improve your makeup routine then take a look at my helpful tips... Hopefully some of them will come in handy


Eyebrows

Since the frames are close to the brow bone it can bring a lot of attention to your eyebrows so it is a good idea to keep your brows well trimmed, tidy and filled in if needed.


Eyeshadow

Depending on the style of your glasses you will probably find that when you wear bold eye shadow you can't really see it as it is hidden by the frames. For a more natural look try some nude shades with black or brown mascara and eyeliner to define the eye. If you want to add a little bit of colour there are some very bold liners available that you could sweep along your upper lashline.

When applying eyeshadow consider how your glasses make your eyes look, do they magnify your eyes or do your eyes appear smaller? If your eyes appear bigger you can use darker, bolder shades as this give the appearance that your eyes are a little smaller, and if your eyes appear smaller you can use more natural soft colours to open your eyes and make them appear slightly larger (a little white eyeshadow at the inner corners usually works nicely).


Apply Plenty of Mascara

To give your eyes more definition and make them look gorgeous apply 2-3 coats of black or brown mascara. This will create a little bit of extra volume and length giving you lashes to be envious of.


Add A Rosy Glow to Your Cheekbones

When you are wearing glasses you want to draw attention away from the glasses and towards your gorgeous features, an easy way of doing this is to apply a blush to give a nice rosy cheek which will warm the face up.


Don’t Forget About The Lips

Your glasses may be hiding your eyes slightly so why not make a feature out of your lips. Play with lipsticks, glosses or lipstain to find a really nice bold colour that looks great and you feel comfortable wearing. 


Hide Dark Circles

If you suffer from dark circles under your eyes, apply concealer to help cover them as your glasses can draw attention to them. Yellow-toned concealer are good for covering up dark circles on lighter skin and orange-based tones blend best into darker skin. You should use a concealer that is 1-2 shades lighter than your foundation. Avoid greasy or chalky products that are too pink or white as this can make you look older or look like a rabbit caught in headlights, which is not flattering on anyone.


If you have found any of this helpful, please feel free to post in the comments below. Also, if you have any requests please let me know :)

Friday, 10 October 2014

Vintage Weddings - How to look like Marilyn Monroe... (Secrets revealed from her personal Makeup Artist Allan 'Whitey' Snyder)

Now everyone knows how amazing Marilyn Monroe was and she is extremely well known for always looking gorgeous (A true style icon) but what most people don't realise is that without the genius of her personal makeup artist, she was quite plain and looked nothing like you see in the photographs. Through a vast understanding of contouring and highlighting her makeup artist was able to transform her from a very pretty but plain woman into one of the most iconic Hollywood beauties ever.

So in this blog, I'm going to attempt to explain step by step, how this transformation was achieved using the same tips and tricks that Whitey used when doing Marilyn's makeup.

The most important factor when applying makeup, especially when trying to recreate a 1940's or 1950's style is above all the skin as it was always flawless.

STEP 1: SKIN
The reason Marilyn's skin always looked flawless was partly down to the makeup application but largely due to her skin care regime. Makeup applies better on moisturised skin, and although Marilyn used to moisturise with petroleum jelly (vaseline), you can achieve the same by moisturising routinely and using a silicon based primer (such as GOSH Velvet Touch Foundation Primer) before applying your makeup. This will smooth out any imperfections and keep the makeup fresher and longer lasting.
When selecting a foundation choose the lightest matt shade suitable for your skin tone (preferably full coverage) and apply all over as normal (remembering to blend into the neck and ears). Using a concealer that is a very similar colour to the base foundation, apply to under eye area and any imperfections visible. Due to female hormones we also tend to be quite red around the nose/nostrils, mouth and chin so apply to those areas if necessary before setting with a light dusting of translucent powder.

STEP 2: CONTOURING
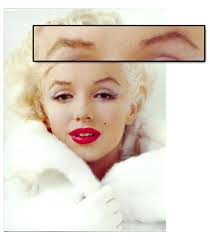
Marilyn was very self conscious of her forehead as she thought it was quite wide and she also disliked the shape of her nose as it is naturally quite round and bulbous at the tip so contouring played an important part of her makeup routine. Contouring was used to exaggerate any existing shadows so slim down certain parts of the face, this can be achieved by using either a bronzer or a foundation which is approximately 3-4 shades darker than your natural skin tone and applying it to the following areas: under the jawline and blending down the neck, below the cheekbones, temples and blending up into the hairline and also down the side of the nose - IT IS IMPORTANT THAT YOU BLEND THIS IN WELL OR YOU WILL JUST LOOK LIKE YOU HAVE A DIRTY FACE LOL!

STEP 3: EYEBROWS
Miss Monroe's eyebrows were almost like an upside down V in shape with the arch being fairly central, this was another trick she used to try draw attention away from her wide forehead. To achieve this look you can either use an eyebrow pencil or eyeshadow and brow brush to define and give shape. For best results I tend to use eyeshadow and a brow brush as you can achieve a closer match to your brow colour by combining shades of brown/cork.


STEP 4: EYES
Apply an off-white eyeshadow over the lid and all the way up to the brow. With a light brown eyeshadow, apply to the crease and up to the brow on the outer corner of the eye (1&2). Apply a frosted white/off white shadow to the inner corner of the eye, the middle of the lid, under the brow and just over the top of the brows (3,4,5,6 &7).
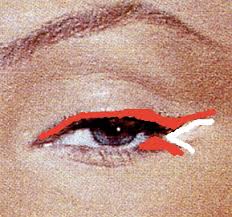
To line the eye, Whitey would apply a white pencil to the lower water line of the eye and also draw a white triangle at the outer corner of her eye which he would then blend outwards. To complete the look he would line her upper lid (close to the lash line) with a BROWN eyeliner and then add a little liner to her bottom lashes to create a shadow effect from her lashes (as shown in red). You can also add a gold eyeshadow over the top edge of the upper liner to make it a little more glamorous (but make sure it is not thick as it may start to look over the top). Coat lashes with black mascara and add strip lashes to the outer corner of the eye. Last but not least, Whitey also used to add a small dot of red lipliner to the inner corner of the eye as this will contrast with the whites of the eye and make them appear brighter.

STEP 5: HIGHLIGHTING
Apply a shimmery highlighter or eyeshadow (I use Benefit High Beam) to the top of the cheekbones, down the centre of the nose, centre of the forehead, browbone, chin and above the cupids bow (after lipstick application).

STEP 6: LIPS
For Marilyn's perfect pout a combination of 3-5 different shades of red with bluish tones were used (this was because Technicolor had a tendancy to make everything look more orange in film). Before applying the lipstick however, her makeup artist would draw just above the cupids bow with a white eyeliner pencil and then blend in to give the illusion of a fuller upper lip. A dark/brick red liner should then be applied to the lips, just outside the lip line and rounding off any sharp angles. A lighter shade of red was used in the middle of the lips and then the darker shades towards the edges to make the lips look more voluptuous. To finish, apply a little shimmer to the cupids bow and the very centre of the lips.

Notice how the lips are nice and rounded (this was very common for the era) and also how the corners of the top lip are wider than the lower lip.

STEP 7: BEAUTY MARK
By now you should have the desired effect but there is one thing missing... The iconic Marilyn Beauty Mark. To achieve this is very simple - some people will use a black pencil (which is fine but tends to look a little unnatural). I tend to use a very small brush with some dark brown eyeshadow to dot it on the skin but you could also use a brown pencil (experiment and see what works best for you) then as with everything, apply a small amount of powder to set the look and you are good to go.

Monday, 6 October 2014

Is my Wedding Make-up Artist ripping me off?

Short Answer: No!

This article could be finished right here but I think it is only fair that you all get a full explanation to back up that answer. So here goes...
If you're planning you're wedding already, you have probably noticed that whenever the word wedding is attached to something you are buying the price goes up. It's frustrating and you're thinking, "why is it more expensive, if it was for my birthday I would get it for a lot less?". Well, the fact is, it is not for your birthday - it's for your wedding. It's supposed to be the best day of your life so you want to ensure you get an amazing personalised service, have a fantastic day with nothing to worry about and you want to look and feel like a princess.

Wedding budget's vary massively, personally I only spent about £5,000 on my own wedding but then I did my own makeup and including myself and my husband we had 12 people in total attending, but I also have friends who have spent over £20,000 on their big day. The most important thing about your budget is to consider what is important to you so you get the result you want and deserve. If you're budget is £7,000, no matter how hard you try you will never have a wedding that looks like you spent £70,000 so it is important that you spent the money on what matter's most to YOU!

For example, when did you ever hear someone say, I'm so glad I went for the cheap photographer, the photo's are amazing? If you pay a photographer £200 for your wedding photography, chances are they are not going to spend the same amount of time and deliver the exact same results that a photographer you would pay  £1,000 for would  (which is about the average/possibly below average for a full day's coverage where I live). There's got to be a compromise somewhere - whether that is the amount of time they spend photographing the wedding or the quality of the images you receive

Now I do not know many brides who don't want to look their absolute best on their wedding day and your make-up artist and hair stylist play a massive role in how you will look on your big day. They are also vendors that don't usually charge any more than what you would pay for any other individual service they offer just because it is a wedding - the only difference is that you pay for an additional pre wedding trial to ensure that you are happy with the results before your big day. 

When you are choosing your make-up artist you will however find many people that are offering a service at extremely low prices, be wary as this usually means they do not have insurance or relevant training or using cheap products that may not last throughout the entire wedding day - ensure you do a little research and also ask to see images from previous brides, or even ask if you can be put in contact with their previous clients to speak to them directly about how good the service was.

If you have seen a make-up artist and are set on using them for your bridal make-up, contact them in the initial planning stages and ask them to do a personalised quote for you so you are aware of what you would need to budget for. Don't make the mistake of waiting until you have booked everything and have very little money left within your budget, expecting them to lower their price. This happens extremely often and usually the bride ends up either doing her own make-up or using a make-up artist she is not completely happy with. 


Remember Quality over Quantity...

The quality of make-up artists varies greatly and this is reflected within the pricing. You have people who are in the beginning stages of their career and are still learning, more experienced artists and those who are the very best in the industry. Basically, you get what you pay for - if you want the best in the industry, expect to pay a lot more than what you would pay for someone at the very beginning of their career with little experience.
Would you expect to walk into a wedding dress boutique and buy a dress designed by Vera Wang for £100 just because you wanted it and you had spent the rest of your budget elsewhere? It is important to remember that these people are running a business and providing a service to you because that is their job and just like everyone else in the industry they also have overheads, including:
   
  • Relevant training and updates to remain current and aware of new trends
  • Insurance
  • Advertising and website costs
  • The professional quality products and tools used, make-up and brushes, etc
  • The amount of time you spend doing quotes, invoicing, attending to enquiries, researching suitable products for people with allergies or special requests, packing your kit, on the road to your venue, finding parking, paying for parking and tolls where applicable (this is where travel &/or parking/toll fees will be invoiced), setting up, hanging around for touch ups, or the extra time spent waiting for your client to finish tying up loose ends on phone calls etc that delays the amount of time they are in your seat
I completely understand that not everyone will see the art in make-up artistry  and you may think that it all looks the same, but trust me, the quality of work can vary dramatically!

If you are not too bothered about the make-up side of your wedding but don't want the hassle of having to do it yourself then you are definitely better off going for a lower experienced/budget MUA but if you want to look your best and are very particular then a more experienced make-up artist would be for you as they will have a better under understanding of how to accentuate your best features and they will also know how to get the perfect balance between looking amazing in person and in the photographs. Just remember that quality come with a price, they are not trying to rip you off, they are just offering a higher end service.

I hope this article has made sense and I have also added a rough guide below to give you an idea of what you can expect to pay for make-up services in the UK

  • Students/Newly Qualified: £75-£90pp including pre wedding trial (this is an absolute base rate, and I would seriously question the credibility, product and hygiene of any artist charging less than this!)
  • Experienced artists: £100-£140pp including pre wedding trial
  • Industry Professionals: £150- £200+pp (although in some cases the price can be upward of £1000pp for some celebrity make-up artists)

It is also common for make-up artists who are travelling large distances (usually over 10-20 miles) from their location to charge additional mileage, which will vary between each individual business. (The government suggestion is 45-50p per mile)

**These prices are loosely based on the average make-up artists pricing per person within the UK, and is to be used as a guide ONLY. As stated above, please note that all makeup artists have different rates, inclusions and terms and conditions. Please consult your personal makeup artist directly for any further advice, prices or quotes etc. Average costs will also vary greatly depending on the County the make-up artist is based i.e. a small rural town mua may not have the same average cost as a major city mua.
Haley x.


This is based on the original blog of Australian Make-up Artist Nikita Pere. I thought it would be a good idea to translate the appropriate information aimed specifically at the UK but as the idea and some of the content is not mine I felt it was appropriate to give a link to the original blog:
(http://nikitaperemakeup.com/is-the-makeup-artist-for-my-wedding-ripping-me-off/)

Sunday, 5 October 2014

Wedding Dress Collections - Pronovias 2015

There are some absolutely gorgeous wedding dresses out there at the moment but I am extremely excited about these gorgeous dresses that have been presented as Pronovias 2015 Collection.

Here are a couple of my favourites...


To veiw the full collection, visit http://www.pronovias.co.uk/bridal-dresses-2015

Saturday, 13 September 2014

When I'm not working with stunning brides...

I often get asked what I do when I am not working with the gorgeous brides that book me so I thought it would be a nice opportunity for you to get to know the woman behind the make-up and also get a glimpse into my other make-up world.

During the bridal season I am usually swamped with either weddings or bridal trials and as I love being busy and meeting new people, I am in my element but during the week days and the winter months things can be quite slow so I also work with various UK based photographers and fashion designers to create amazing images, some to graze the pages of some of your favourite magazines and some purely because they want to create some beautiful images.

Recently I worked on a fantastic fashion collection by an up and coming designed called Lisha Fantus. This was an amazing experience as the shoot was at a Gothic Church in the centre of Nottingham and I got to work with the amazing Elspeth Van Der Hole and some other amazing creatives and models. The images are yet to be released as they have not yet been published but here is a little taster of what we acheived...


In my spare time I tend to be very make-up orientated and can often spend hours trying out different looks or new techniques on myself and I will also spend time preparing for upcoming shoots by creating face charts and researching themes and looks to ensure that I stay as current as I can.

Don't get me wrong, my life does not completely revolve around make-up and most of the time I can be seen wandering around with very little make-up on. I love how much make-up can transform a person and it is a great form of art and expression.

Another form of art and expression I enjoy is music. Those that know me will be aware of the fact that when I was younger I wanted nothing more than to be a singer, I even got to record my own single with the very talented Chris Sutton but unfortunately it wasn't meant to be. Since then I have been in various different bands and could usually be found at the local karaoke. I am now one half of Oklahoma Sunrise, which is a country duo made up of myself and a very talented man with an acoustic guitar (Jim) - I am hoping that one day I can accompany him with my guitar but I have still got a long way to go before being anywhere near playing in public.

Well, that's pretty much it about me and what I get up to in my make-up and non make-up life, if you would like to know anything else please feel free to ask :)

All the best,

Haley x